Imagine every article of clothing you’re wearing. Your shirt fits according to one size measurement, pants are another, and then there are things like shoes, gloves, or even a hat. You have a lot of sizes to keep track of, and for good reason. Everybody has unique proportions, making it unlikely to simply say you are a “large” in everything.
Bikes are the same way. Yes, a bike could be called a “large,” but there are more nuances to the geometry than just size. To get the correct fit and desired handling, you should take the time to examine its geometry and understand how it all works together.
In this beginner’s guide, we’ll demystify some of the standard bike geometry measurements. We aren’t going to be able to tell you exactly which reach is right for you, or which chain stay length you’ll prefer. The first step is understanding what these geometry numbers are measuring and then comparing them to your own bike or one you used to ride.
“When people look at geometry, they tend to only understand a small portion of it, and they make decisions based on only that small portion,” says Lennard Zinn, a frame designer and builder and author of the best-selling book, “Zinn and the Art of Road Bike Maintenance.”
Above all, it is key to understand that all of a bike’s geometry numbers work together in harmony. One data point won’t answer all of your questions about a bike’s fit or handling.
Three key measurements
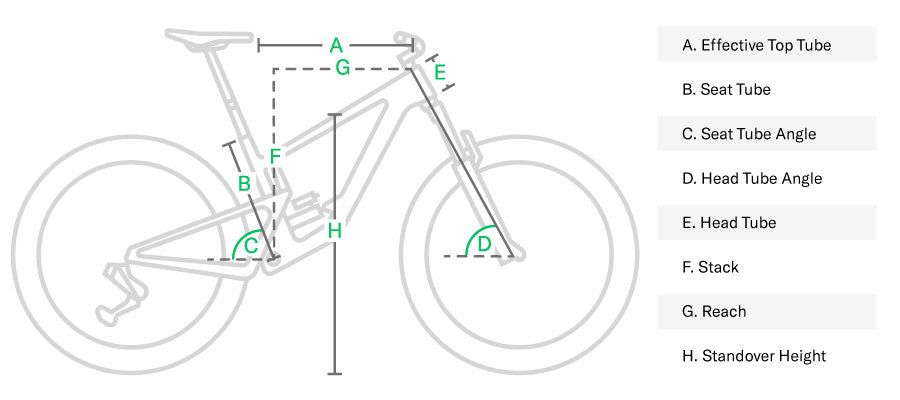
Some bike manufacturers overwhelm you with geometry charts that have 20 or more measurements for a given bike. Reach (G), stack (F), and head tube angle (D) are a few key numbers to focus on as you familiarize yourself with geometry as it relates to fit and handling.
Before diving in, it’s important to note the differences between road and mountain bikes. On a typical road ride, your position on the bike is very stationary. When riding a mountain bike on trails, your body position tends to be far more dynamic.
“Fit is less critical on a mountain bike than it is on a road bike or cyclocross bike because you don’t tend to be sitting there in that same position, grinding away. You're out of the saddle moving around,” Zinn adds. “On a road bike, you're grinding away the miles and everything has to be in the right position relative to your body parts. If not, over time you’ll either lose efficiency or you’ll hurt a lot.”

Reach
When you sit on a bike, reach is likely the first thing you notice. This measurement extends a vertical line straight up from the bottom bracket and measures from that point to the center of the head tube. As the name “reach” implies, it’s the distance from your body to the bars.
Reach is similar to top tube length (explained below), but it is a more relevant measurement for mountain bikes because you’ll often ride in a standing position, perhaps even with the seat lowered via dropper post, making the top tube measurement (from saddle to head tube) less applicable. Since road riders spend the majority of their time seated, top tube length is often more important, but reach should also be considered.
If your arms don’t have a comfortable bend while you’re in a normal riding position, the bike’s reach might be too long. If your bike feels cramped and small, reach might be too short.
Sometimes, small imperfections in reach can be remedied with longer or shorter stems, but only within a range of about 20mm in either direction. For example, if you’re setting up a mountain bike that would ordinarily have a 70mm stem, it would be inadvisable to install a 110mm stem to compensate for reach that is too short. However, it would be fine to go from a 90mm stem to a 100mm stem to fit a gravel bike.
Stack
Similar to reach, stack measures the relationship between the bottom bracket and the top of the head tube, except this time it pertains to the bike’s height. Stack measures the vertical distance from bottom bracket center to a virtual horizontal line from the top of the head tube.
Many experienced road riders tend to prefer bikes with short stack measurements to easily get their handlebars in a lower, more aggressive position for aerodynamics and cornering. Novice riders usually feel comfortable on bikes with more stack, thus a more upright position. Also, riders with shorter arms and torsos or limited spinal mobility may prefer more stack.
Similar to reach, a different stem angle can help a rider fit onto a bike that is a bit out of range when it comes to stack. For instance, a 10-degree stem could simply be flipped to become -10 degrees, lowering the bar position.
Head tube angle
While stack and reach are usually referenced when discussing how a bike should fit, head tube angle is a typical way to assess a bike’s handling characteristics. The angle is measured in degrees, with 90 degrees being vertical. As the head angle decreases it becomes "slacker." As it increases it becomes "steeper."
Bikes with slack head tube angles tend to be stable at high speeds but less responsive to steering input if you’re turning a sharp corner at slow speeds, such as an uphill switchback on a singletrack trail. Steep head tube angles are usually the opposite in terms of handling.
However, this is a very big oversimplification of bike handling and steering. Other variables, such as fork offset, stem length, and wheel size can affect how a bike corners — sometimes even more than head tube angle.
The average head tube angles for bikes we sold in 2019 are:
Mountain bike: 67.79 degrees
Road bike: 72.62 degrees
Gravel/CX bike: 71.57 degrees
Road, gravel, and cyclocross bikes vary the least in terms of head angles — they’re usually all within the range of 70-73 degrees. Mountain bikes have a more diverse range of angles, and they usually correspond with the bike’s suspension travel. A short-travel cross-country race bike might be between 67 and 69 degrees; a trail bike between 66 and 68, and an enduro bike between 65 and 67 degree head tube angle. As you can tell, the categories often overlap.
Other measurements to consider
Seat tube angle
Since we are on the topic of leg length, seat tube angle is also something that might come up as you examine bike geometries. This is an effective angle from the top of the saddle to bottom bracket center.
Riders with shorter legs generally need to sit further forward, relative to the bottom bracket. The traditional method is to position your knee over the pedal spindle when your crank is at 3 o’clock position. This position can be achieved with a steeper seat tube angle. It can also be addressed with saddle position or seatpost choice.
On mountain bikes, seat angles have become progressively steeper, regardless of size, to position the rider forward on the bike, improving weight distribution on steep climbs. Drop-handlebar bikes (road, gravel, ‘cross) haven’t changed nearly as much.
“Seat angle really should depend on your physiology,” Zinn adds. “If you know that you’re someone with long thighs and short lower legs, you’re looking for a bike with a shallow seat angle to get your seat back far enough and the opposite if you’re built like a swimmer.”
Effective top tube
As we’ve covered, top tube length is relevant for road, gravel, or cyclocross bikes, but it isn’t as crucial when looking at mountain bike geometry. If you spend a lot of time pedaling in the saddle, it’s important that your top tube is appropriate for your torso and arm length. It is typically measured on a horizontal axis from the center of the seatpost to the center of the fork's steerer tube. Like reach, you can compensate for a longer top tube with a shorter stem and vice-versa.
Seat tube length vs. standover height
The final measurement is quite simple: Seat tube length generally measures from the center of the bottom bracket to the top of the seatpost.
This is the old-school way to size a bike, especially for road bikes. A size 56cm frame would measure 56cm from bottom bracket to seatpost clamp, for instance. But nowadays, most road bikes have sloping top tubes, meaning that something like a 56cm Specialized Roubaix has seat tube measurement of just 48.5cm.
While seat tube length won’t tell us much about how a bike fits or handles, a related measure will: standover height. Remember when you were a kid and your mom or dad had you straddle a bike’s top tube to see if your feet touched the ground? Well, that is standover, a measurement from the ground to the top of the bike’s top tube. Too much standover height and you won’t be able to comfortably put a foot down. Is there such a thing as too little? Not necessarily, but it might be symptomatic of a frame that’s too small for you. Full-suspension mountain bike frame design has led to bikes with very low top tubes, thus low standover height.
Conclusion
The best thing you can do for starters is to Google your current bike’s geometry, and either save it or print it out to have as a reference when you’re shopping for a new bike. If you have particular complaints about your bike’s handling or fit, they might correlate to one of the basic geometry figures. The next step would be to try addressing them with a different bike.
Have you always hated how your mountain bike feels twitchy on descents, sometimes threatening to toss you over the bars in steep, rough terrain? Perhaps something with a slacker head tube angle and a longer reach would be an improvement.
Does it seem like you are always riding on the tops of your road bike’s handlebars to escape that uncomfortable stretch to hold the drops? A bike with taller stack might give you more options to position your hands while keeping you comfortable and in control.
These are just a couple of simple examples. At the very least, if you start thinking about these variables and remember that bike geometry numbers work together in harmony, you’ll be on the right track.
